Hey everyone. It’s Amanda Mahan from Oxygen Forensics training team. I’m going to go over a new feature that Oxygen Forensic Detective Version 14 and up now has, it is the Merged Extractions Tool. With this tool, you can now merge all sorts of extractions.
Now, I know that some of you are probably familiar with merged extractions, but this is taking it up a notch. This is not just merging a physical and a logical extraction together, it’s not just merging that iTunes backup and a Checkra1n extraction. You will now have the option to merge other types of extractions.
So if you have a cell phone extraction, maybe a physical from an Android device, and you have extracted that SIM card separately, now we can merge those extractions together. Another way to merge extractions, what if you have an iCloud extraction? Because as you guys probably know, as an Oxygen Forensic Detective user, you have access to the Cloud Extractor and that didn’t cost you anything extra, you just have access to that extractor, it comes with the tool.
So let’s say we get that iCloud extraction and we have an iTunes backup, and we want to put these together and compare some data. Because you know you’re going to get different sets of data with each type of extraction. Then maybe you checkmate that phone, you get an extraction from that, and let’s add that in the mix, too. Let’s merge all of these extractions together and compare one data set, making our life a whole lot easier.
Another way to merge data would be, if you have a cell phone, maybe someone has deleted a lot of the calls and text messages, and a lot of the events that you can’t recover, you get the cell phone extraction, but now you need to take it up a notch and maybe get that CDR, your Call Detail Record. And as you probably know, once again, with Detective, you get the extra tool, the Call Data Expert, which allows you to pull in a CDR, parse it, pull it over into Detective and put it in your case.
Now, you guys, we can pull that CDR with all of those records and merge it with our cell phone. That is a huge leap. All of your data is in one data set. That’s the easy button, right? So this is what I want to demonstrate for you today. So here we go. Let’s first talk about merging an iCloud extraction with an iTunes backup.
So, our first example takes us to iTunes and iCloud. You don’t need the phone for these two types of extractions. That’s the beauty of it. So we don’t have a phone, but maybe we have someone’s computer. We now have the opportunity to run KeyScout, which is another one of those tools that you get with Oxygen Forensics without any extra charge.
So we run KeyScout and KeyScout, of course, this is something that you run on the computer, and what it does is it goes and finds computer artifacts and it finds log-in credentials and tokens, and it also captures all iTunes backups. So this may not be the latest and greatest version of the phone because maybe the iTunes backup happened last week, but maybe it happened yesterday or this morning. So it could be a pretty up-to-date iTunes backup.
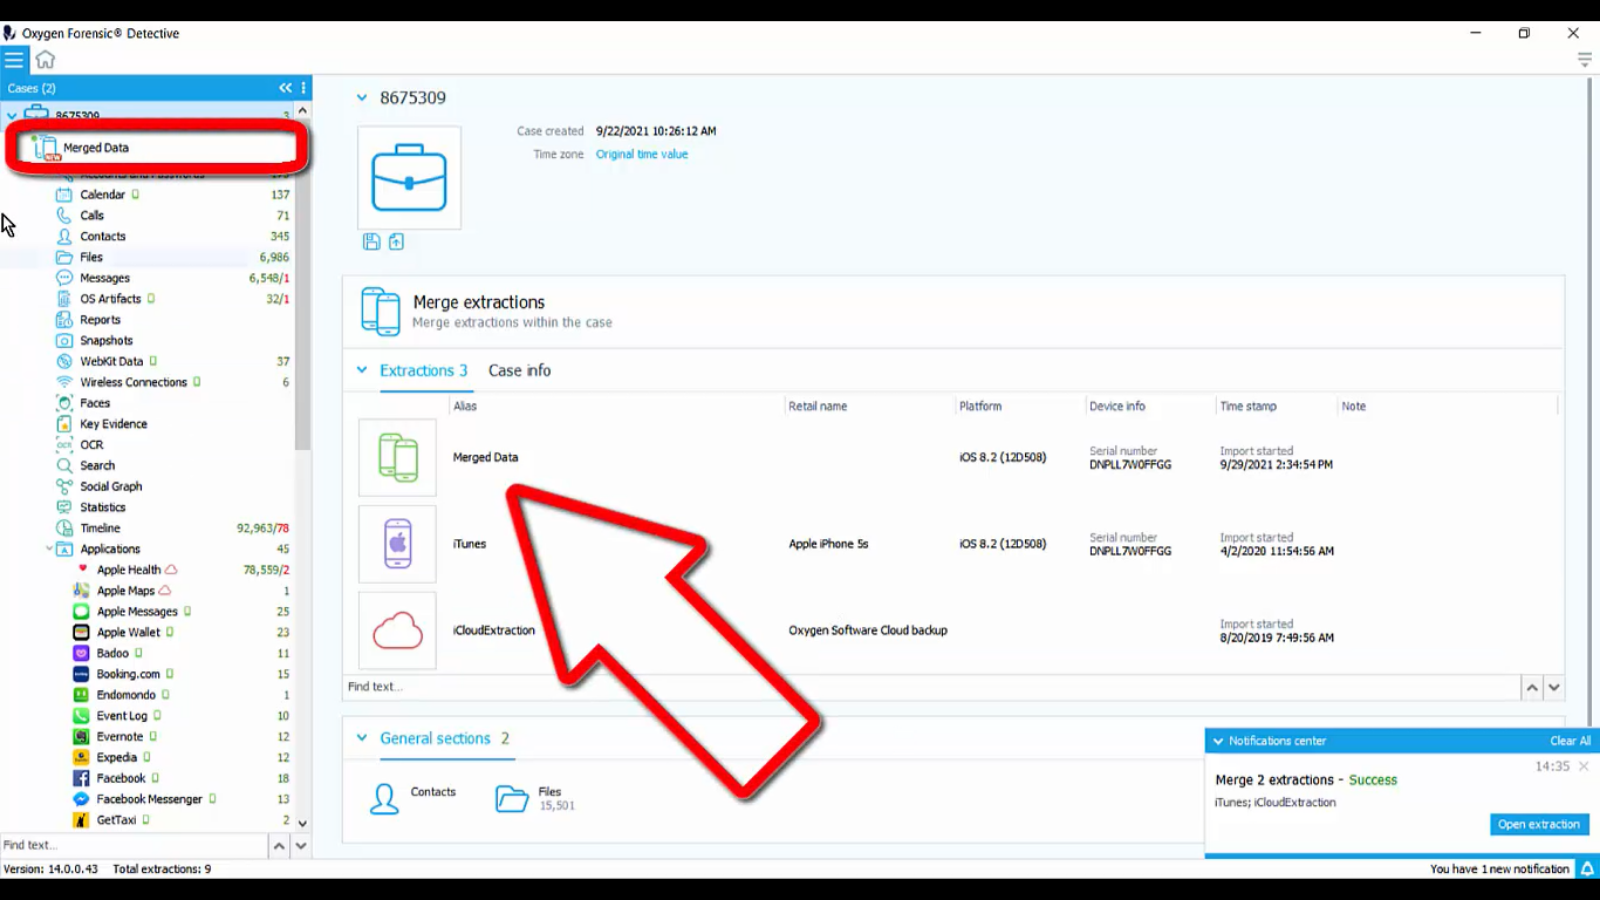
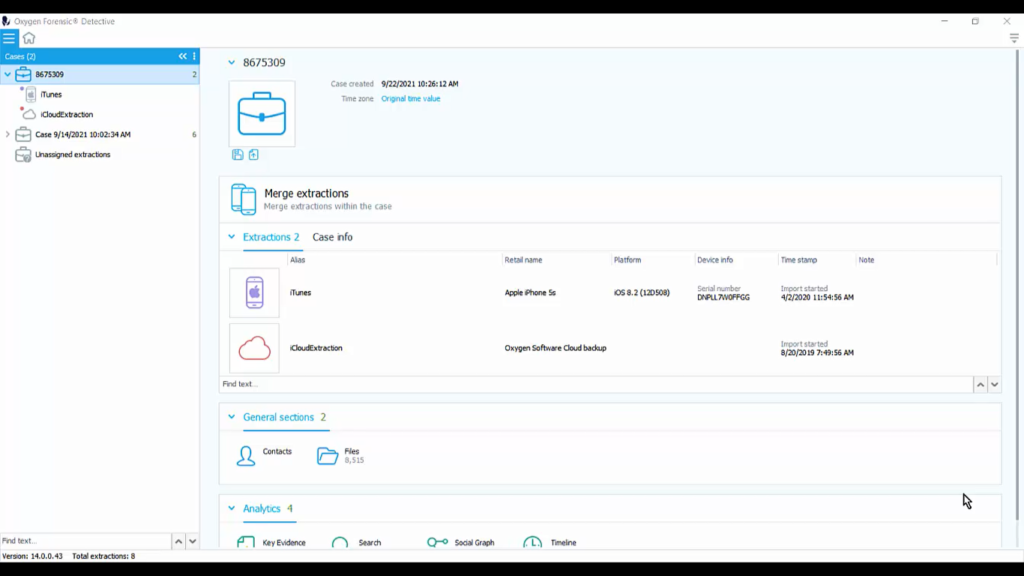
So we grab the iTunes backup. Again, we don’t have a phone here, we have the iCloud credentials. We get into the Cloud Extractor and we take down all of that iCloud data. So now we have two data sets and we have no phones, but we still have loads of data to review. So if you look at my first case over here, you can see that I have that iTunes backup, and I have the iCloud extraction.
Now, within the case, so I’ve clicked on my case. When I click on my case in the case list, I will see all of my extractions in the center of my screen, I see that I have those two extractions in here. I can look at my case info, which is where I would add my case number, date, and maybe even the location of the crime or wherever I seized the device from. And then under that, we’ll see a couple of general sections where we can look through all of the contacts and all of the files in all of the extractions.
And then we have some analytic capabilities such as our key evidence bucket, we can have search functionalities throughout the case, and we can throw this onto a social graph and start to do some link analysis. What kind of common information is going on between this iTunes and iCloud extraction? I would say probably quite a bit. Why? Because both of these belong to the same person, it’s probably some of the same data, but that’s what we’re trying to figure out, right?
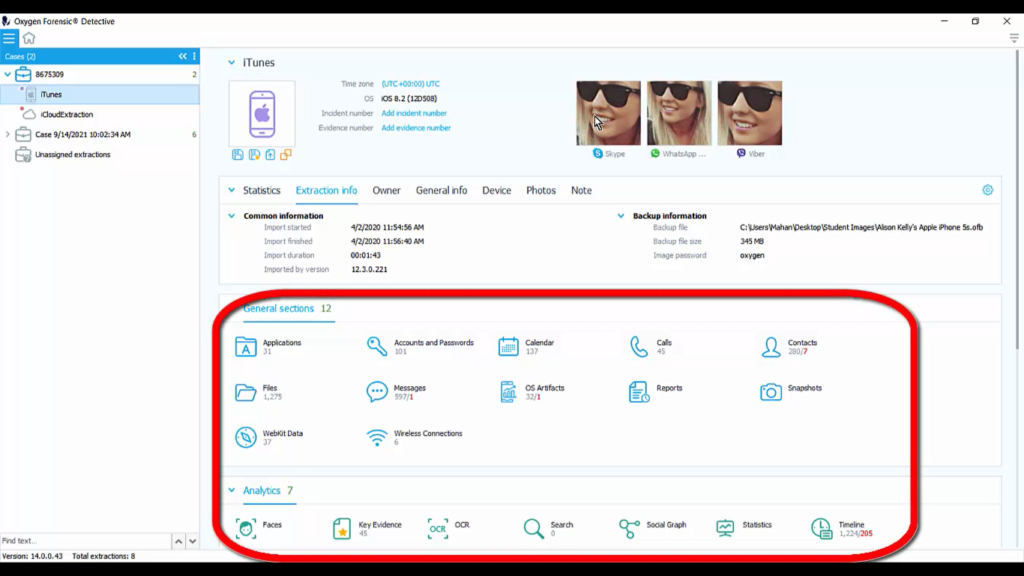
And then we have the timeline section that we can get into on a case level. Now, when I click on just one individual extraction, you can see that I have tons of other general sections and a few other analytic tools. And if we scroll down, it actually breaks out the applications for us one by one.
But what we want to do is something on a case level. And inside of this case, I’ve got the iTunes and iCloud extraction that I want to, and here it is, you guys, merge extractions. This is the new tool. And like I said earlier, you can merge any type of extraction together. It’s going to pull the data together, show you some commonality, and it’s going to show you which extraction all of this data’s coming from by just putting an icon next to that dataset.
All right, so let’s do this. Let’s click ‘Merge extractions’, and here are our options: iTunes, iCloudExtraction. These are the two ones we want to merge together. So what does this tell us right off the bat? It means you need to create a case and put the extractions you want merged together inside of that case. And then you have that tool to merge the extractions.
So we can call this ‘Merged Data’ and we can also choose to recover any type of application data that may be deleted. So what this is going to do is go into our application containers into those databases and any deleted data that we had in there it’s going to carve that for us.
So I’m going to choose to turn that on. And you may have already carved this data at your original import because you know, you have those options at your configuration menu over in the right-hand part of your screen. You have global options here where you can choose to carve it as soon as you pull it in the first time.
But, let’s just say that we didn’t, or we want to be sure that we’re carving out deleted data. I’m going to go ahead and check this box. And then it says, ‘Select the merge level’, by default extractions are merging at the analyzed data level. The file system of each extraction is analyzed separately and then the resulting data is added to the merged extraction.
All right, let’s do this. Two extractions will be merged into one and let’s create a merged extraction. So the great part about this is now that we’ve got this ‘Merge extraction’ going on, we will still have our individual extractions available to us. After seeing the merged results, if you decide that this is not the best way to analyze this data, you can always go back and just review the extractions individually.

All right, we have merged two extractions. Success. So over in our case column, you can see the merged data. Now, ‘Merged Data’ is what I named it. So I’m going to click on ‘Merged Data’ and if we want to change the name of this, we can do that as well. I’m going to right-click on it, rename ‘Extraction’ and say ‘2Extractions’, just to show you that we can rename this if we need to.
And once I scroll down, you will be able to see different color icons. These icons are letting you know, all right, this Apple Health data set came from that Cloud extraction; Apple Maps, Cloud Extraction. Remember we did an iCloud extraction? That’s what that’s referring to. And here are all of the applications individually that came out of the iTunes backup. So now we have all of that information in one merged extraction. This is iCloud and iTunes in one.
So I have another case for you to look at. And inside of this case, we have collected multiple items for extraction to review. The easiest way to review this is look at it on a case level and then go into the Timeline section.
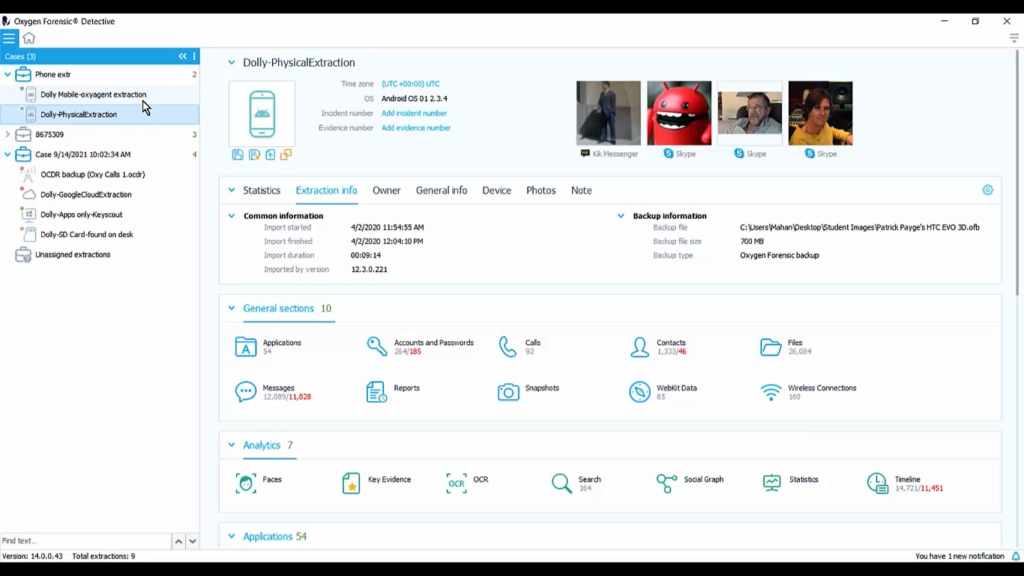
Another way to do it is merging the extractions. Now, which ones would you want to merge? So if you look in this extraction, you’ve got a physical extraction from an Android device, an OCDR, now that stands for Oxygen CDR backup, that means we processed a CDR with our Call Data Expert tool, and then we brought it over into Oxygen Forensic Detective, the parsing tool, so we can place it in the same case as the rest of our data.
Don’t forget, once you pull any dataset into Detective, we can throw that onto a map and that’s any dataset; CDR, cell phone extraction, even EXIF data from an SD card. If it has some geo data on there, we can throw it on a map and not just one layer, but multiple layers.
So, for this case, if I have a CDR and a physical extraction and a Cloud extraction, and all three of those have its own geo dataset, I will have three layers on a map, which makes life a whole lot easier when you’re trying to see some locational information about a person.
Getting back to merged extractions, let’s say that we need to review the physical extraction with the OCDR, this CDR backup. Why would we need to do this? I mentioned it previously. What if this person had deleted phone calls and deleted text messages and they weren’t recoverable at that point? This would help us fill in those blanks.

So we could most definitely go into our physical extraction and into our OCDR, in one dataset, if we merge them, throw this on a timeline, and now we can fill those blanks in.
Now let’s look at what else we have in here. We talked about Cloud extractions. This one is a Google Cloud extraction. So if we want to place this Google Cloud extraction in the same extraction, merge them together as that physical extraction, we will be able to see, all right, what if this person is on their cell phone and they’re on the computer at the same time, they’re talking to someone, what are they searching with their Chrome browser? Just think about how useful that data can be.
Let’s also consider this SD card. This may have some photographs on there. Were they saved from a computer? Were they taken by camera? Was this an SD card in maybe a drone? What is this data? Well, if we were to merge this data or at least compare this data with an extraction, we can see it on a timeline and see exactly what’s going on there.
We also have an OxyAgent extraction. I would say if I had to pick two of the most important ones to merge together here, it would be that physical extraction of the cell phone and the OxyAgent extraction. With the OxyAgent extraction, this is that portable Android extractor that you can use. And remember, you can save this out as many times as you want and hand one to each of your agents out in the field. Everyone has an OxyAgent Android extractor in their go-bag.
So if you have an OxyAgent extraction, you may have been able to capture some different data, more data, especially with the third-party applications data extractors that are built into the tool. And wouldn’t that make life easier if we were to merge that OxyAgent extraction into that physical extraction? And here we can do that.
So let’s say that this is our plan. We’re going to merge that OxyAgent extraction into that physical extraction we got from the cell phone. So this is what I would do. I would bring my physical extraction into a new case and call it ‘Phone extractions’, add that new case, and then I’m going, here, it is right here, the phone extraction, click ‘OK’, and now that one device is in there, that physical extraction from the Android.
Then I’m going to come down here and pick up my OxyAgent and throw it into that same case. Now I can merge these two together and we can review this on a timeline. So let’s go ahead and click on the phone extraction case level, and here’s our option to merge extractions.
So here we go, let’s merge these extractions. Same options. We’re going to say ‘Phys/OxyAgent’. And we’re definitely going to do that applications data recovery. We did get a physical extraction and remember if we didn’t carve for that data when we originally pulled that extraction in, that original image of the device in, we can do it right here, all right? And we are going to create the merged extraction. In your notification center, you’ll be able to see once this is finished.
All right, so let’s do a quick review on why we do this and how it is so useful. If you look over in the left-hand column, in my Cases dropdown, you’ll see, in my Phone extractions column, I have two extractions. Now you guys know that this is really for extractions, because we put an iCloud and an iTunes backup without a phone present, we put that into one merged extraction, and we also have a physical and an OxyAgent extraction that we merged together.
Now, say that one is our suspect and one is the victim, or maybe these are two suspects, and we’re trying to find some commonality. We need to do some link analysis. So this is where the fun comes in. Now let’s compare this data. We are comparing two separate merged extractions.
So, here’s what we’ll do: we’ll on a case level, review these two datasets. So we’ll come down to our social graph and we will now see that we’ve got Jenny’s phone over here, not her phone, but her iCloud and her iTunes, and then we have Jesse’s phone down here, we’ve got a physical extraction and an OxyAgent merged together, do we have any commonality here? That’s the question.
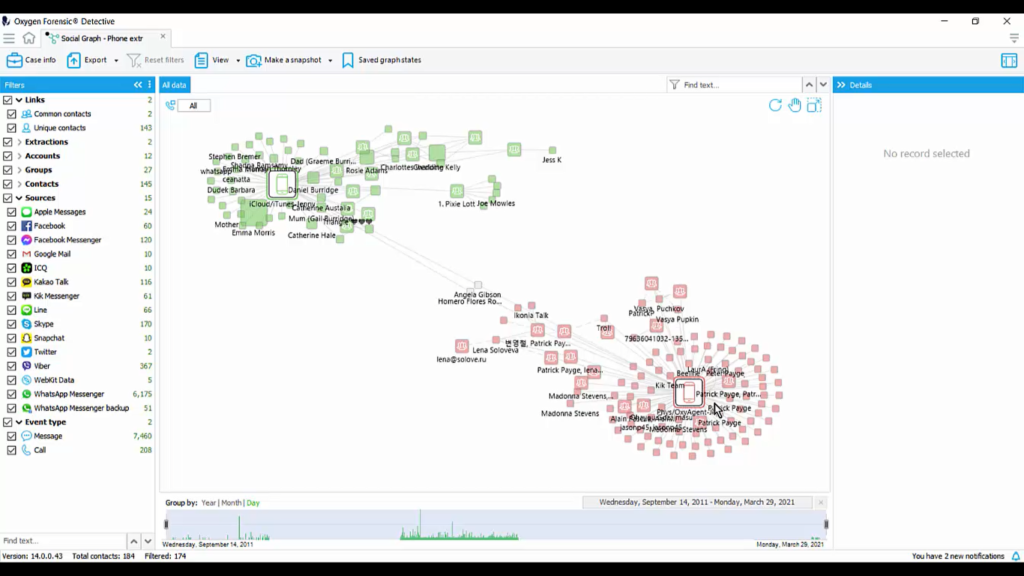
So I’m going to go over to column one, which is the column all the way on the left and look at my unique and common contacts. And what I want to do is find the common contacts and there they are, right in the center of my screen.
Now, if we highlight these two people or these two contacts, we can get unique information just about those two common contacts. And keep in mind, these common contacts are somewhere in that iCloud and iTunes backup, and also in that physical and OxyAgent extraction.
So how are we going to review more information about this? Let’s go over to our timeline, back to our column where our phone extractions are, we’re going to the case level, and then we’re going to go into the timeline section. Inside of the timeline section, you have a ton of tools that you can work with here. If you need to filter down to a specific extraction, you can do so here.
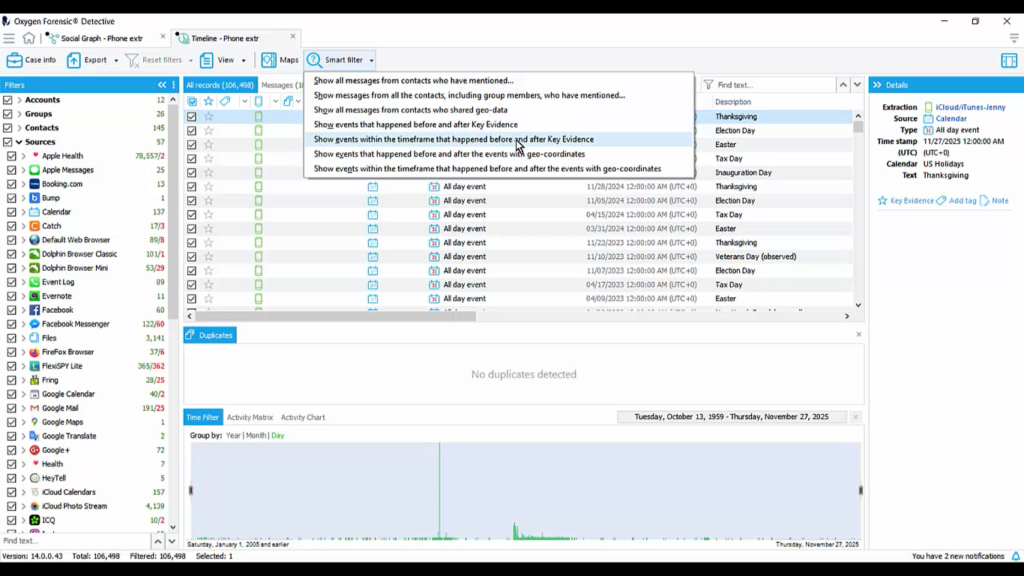
We have something called a Smart Filter where you can show specific messages from all contacts who have mentioned, and you put the text value in here. If there’s a specific word you’re looking for, you put that word in there and it will narrow it down to the contacts that have mentioned that word and you can even narrow it down to group members involved that are talking about a certain text value, whatever it is, if it’s some type of drug training something, any type of money laundering case, anything like that, you’ll be able to see all text messages from those people involved. And remember, we basically have four extractions in here we’re looking at.
We can also narrow this down pretty quickly by after we mark our key evidence, maybe we want to see before and after key evidence events. And now we’re really looking at what’s happened among all four of these extractions somewhere around the key evidence; either events before by number, or we can do by timeframe. So within one hour before, or one hour after, the key evidence that we marked, we’re going to be able to review all of that data.
Now, let me show you what that looks like. I’m going to find an event. Let’s go here. And I am going to mark this as key evidence, and I want to see everything that’s happened before and after this, maybe by an hour just to see what’s going on.
So I’m going to use my smart filter, and I’m going to go to ‘Show events within the timeframe that happened before and after the Key Evidence’, and I’m going to kick this up to, let’s say, two hours and apply that. And now I have filtered this to just what happened two hours before and two hours after that one event.
I can take this down even further, because that seems to be a lot of data, and maybe I just want to go 20 minutes, and that is it, and apply that. And now I’ve narrowed it down to just a 20-minute event before and after that one piece of key evidence.
So just a quick recap, we can now merge extractions, not just as regular cell phone extraction, whether it be physical logical file system extraction, but we’re talking about iTunes backup, iCloud extractions, any type of Cloud extraction, a SIM card, Oxyagent, all of those things can now be merged into one extraction for data analysis. For more information on Oxygen Forensic Detective, and for training opportunities, please contact us.