by Scar de Courcier, Forensic Focus
Griffeye Analyze sprung from a need for better triage and decreased investigator stress in child exploitation investigations. Specialising in visual media, the idea is to increase workflow whilst decreasing the level of exposure for analysts.Although the idea was born from experience in child exploitation, and this was also the use case for this review, Analyze DI Pro can of course be used across a range of cases for triage, similarity matching and more.
Creating a case is straightforward and works the same as it does in most other tools. Simply start up Analyze and bring in your evidence. It supports most evidence types, including E01 files, folders, raw images, dbs, and most open source forensic image files.
Analyze will automatically check against certain databases for child exploitation files. It can be easily preloaded with file signatures of known indecent images and videos of children, and it also works on PhotoDNA.
Every file on the E01 will be automatically checked against the database and categorised. In the USA there are three categories of child abuse content:
– Child Abuse Material
– Child Exploited Material
– CGI Child Expliotation Material
These three categories are included within Analyze, along with ‘Non-Pertinent’, i.e. files it knows do not contain child abuse material, and ‘Uncategorised’, which it uses for files it hasn’t seen before. Often an investigation will begin here, especially if there is known child abuse material in the case as well. The primary goal of most investigations is to identify victims and prevent them from coming to further harm, so starting with known unknowns is a good step towards this.
When you import your E01 or other type of file, you can select what you want Analyze to do with it. You can create a collage, extract video frames, look at audio levels, detect nudity, and perform facial detection on both pictures and videos.
Once you have chosen your options, click ‘Next’.
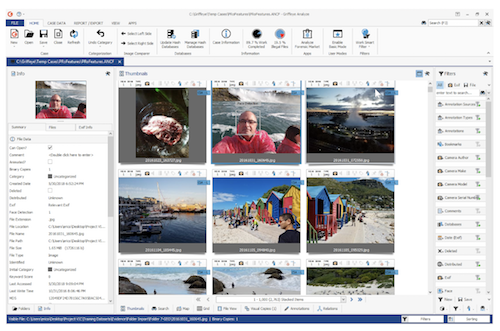
Analyze is a highly visual program which immediately shows you thumbnails of the data you have brought in. You can then go through the data and look at them in more detail, and you can sort according to various filter options. The background colours of the thumbnails align with the categories.
Visual and binary file copies are stacked within Analyze, so you only have to look at a file once even if it’s stored in multiple locations. Often child exploitation offenders will have multiple copies of the same image, and repeated exposure can take a significant psychological toll on investigators, so ensuring they only have to view the file once can help to decrease this. The difference between visual and binary copies is that visual copies are stacked using PhotoDNA matches, whereas binary copies are stacked using MD5 matches. By default, Analyze stacks all matched copies of the same file, whether MD5 or PhotoDNA.
Of course the decreased psychological trauma on the investigator is not the only advantage of this method. Deduplication of work upfront means that human processing times are significantly reduced and can really help with backlog. In one investigation, the workload was apparently decreased by 65% just because of deduplication, and when the Project VIC hashset is added in along with precategorisation options, you can end up with even greater time reductions.
When you fire up Analyze and add your files you will see a comprehensive set of filters in the bottom right of the screen. Ideally Analyze should be used across two large monitors – I was looking at it on a laptop screen, which didn’t quite give the full experience but still worked perfectly well.
The filters that come with Analyze include all sorts of options: make, model and serial number of camera; GPS coordinates; and so on.
You can also do this the other way around; rather than selecting your filters from the menu, you can select a specific picture that is of interest, right click it and go to ‘Same Exif Serial Number’ to show all other pictures that fulfil your selected criterion.
Likewise GPS data can be viewed by clicking on the little map at the top of each thumbnail. This will show you exactly where the photo was taken, and you can then tell Analyze to show you all other photos from the same place. There is an offline map built in, so unlike with a lot of other tools, you don’t need to be connected to the internet to use the map feature. If you’re trying to demonstrate a pattern in a group of images, you can select them all and have them shown on a map to see their relations to one another.
Producers of child abuse content often edit their photos to hide who and where they are, but they don’t always realise that editing a photo doesn’t do anything to the Exif thumbnail that’s embedded in the picture. In preprocessing, Analyze will check the Exif thumbnail against the actual picture and will tell you when there is a mismatch: this will show up with a red box along the top of the thumbnail in the main view.
You can also create your own filters: these can be as simple or as complex as you want.
During preprocessing, Analyze creates a 64-frame snapshot of any video file in your case. Hovering over the file in case view will allow you to quickly flick through it. This is great for detecting hidden shots within seemingly innocuous content.
Some videos are very long, so Analyze gives you the option to speed up playback anywhere between 1x and 16x the video’s actual speed. You can also slow it down if you want to look at something more closely. In the upper right-hand corner of the video management screen, you can split each clip up into six pieces that can be watched concurrently. This helps investigators to be able to watch a video much more quickly and identify which parts may be of relevance to their cases.
Scene detection is another neat feature: down the left hand side of the video management screen you will see options showing you where the scene changes, so you can jump ahead to a part that is of interest.
You can also filter by motion, nudity, faces and audio. The ‘motion’ filter is particularly interesting as you can apply it just to a specific part of the frame, so for example if you’re looking for a carjacking on a busy street, you can focus just on the vehicle in question and ignore all the movement around it. The ‘faces’ filter allows you to watch just the sections of video that contain a specific person’s face; or if you want to see people in general, you can click ‘Faces’ and it will filter down to just the bits of video with humans in them.
If you have a corrupted video, you can watch the extracted frames instead; this will show you a second-by-second stop motion style video.
Griffeye works on an open API standard, so you can write software that can be brought in to communicate with it. Anybody can write a plugin for the software.
Clicking on ‘Analyze Forensic Marketplace’ will show you the plugins that have been created – most of them are free. There are many different plugins available, including the following.
Face Recognition and Face Detection
Recently updated to make it quicker and more robust, the face recognition and detection capabilities are impressive. Users can filter photos and videos to show only those that have faces in them, as well as by those that contain more than one face.
If you have an external photograph and you want to search for similar faces to the one in your picture, you can add an external file. Analyze then finds the face in pictures and videos within your case, showing all instances where the same person’s face comes up. These appear as thumbnails which you can then sort through. As with any software, there will be some false positives, but the most likely matches are shown at the top, making it easy to quickly get an idea of whether there are any matches, and if so what kind of content they represent.
Searching for a face within a video is also possible: simply pause the video, draw a box around it, then click ‘find similar faces’. These will then be picked up across all photos and videos in your case.
If you find a file that’s important, you can open it up in Relations and do a relationship search not only with EXIF data but also with faces, then bring up a diagram of all the images that have similar faces in them.

One thing that particularly impressed me was Analyze’s ability to detect faces even when they were not facing the camera head-on. A couple of the examples in the test case pulled out a face where the person had been partially turned away from the camera, and it also detected the face of a person inside a coffee shop, through the glass window.
Hex Viewer
A simple yet useful addon, the hex viewer allows you to look at any file in hex. You can bring in external files, for example E01s or photos, and view them in hex. The ‘annotations’ option allows you to create comments on these files which will then be viewable by anyone else who is working on the case.
Camera Forensics
Camera Forensics is a website with a built-in API. It searches all pictures uploaded to the public internet and scrapes their EXIF data. Originally it was set up to find a specific camera that had been stolen: using the serial number, the camera was eventually able to be located.
Analyze takes every picture that comes into a case and automatically checks it against Camera Forensics’ database. It then tells you if there’s a match, and if your device is connected to the internet it goes to Camera Forensics, checks its database and tells you how many matches there are on the public internet. You can then take these photos and add them back into your case, and then search them against other image files.
Alerts can also be set up via Camera Forensics: for example, if you seize a camera as part of a search warrant, you can then go to Camera Forensics, take one of the pictures you have exported, and load it into Camera Forensics using the drag & drop functionality. It will then read the EXIF information and watch the camera. If anyone uploads a photo taken with that same camera, you will receive an alert.
If you are not connected to the internet, you can still select all the files that have a match on Camera Forensics and export them as a JSON file, which can then be uploaded to the website when you are online.
Social Media Identifier
This is a nifty addon which reads the file names of images and videos as they come in. When you upload a file to most social networking sites they will strip the metadata, but they will often have their own naming conventions. If Analyze sees that the naming convention is similar to one from a popular social media site, it will then notify you to let you know that it might be from a Facebook or Twitter profile, for example.
You can then click on the four little squares in the top right-hand corner of the thumbnail to see where the photo appears online, if you are connected to the internet.
Currently in beta, Griffeye Brain is AI that will detect files and give them a score based on whether there is a high probability that they contain child abuse material. It works by scanning all the information as it comes in and then giving each item a score between 1 and 100, 100 being definitely child exploitation material. So if you have a dataset with hundreds of thousands of pictures, you can run the Brain against it, then sort by CSA score, beginning with the highest.
Object detection is another of Brain’s features: it will go through and detect what it sees in each picture, then make a determination about what it thinks it is. It can also perform basic image manipulation.
One of my favourite features, ‘Relations’ lets you take one file and show all the files that are related to it, and then set up a visual representation of those files.
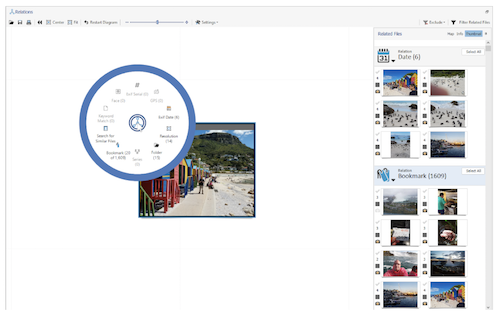
The wheel displays the options for relation, and selecting any one of them will pop up a visual diagram to show you how they are related.
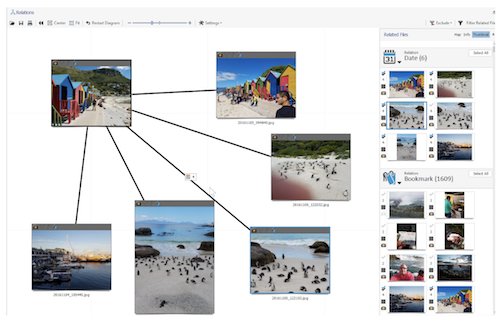
Relation criteria include things like date range, GPS coordinates, Exif serial number, resolution, items found in the same folder, and visually similar items.
Vector image hashing is built into Analyze, which is how it tells which photos are similar. It will then bring them back in order of similarity.
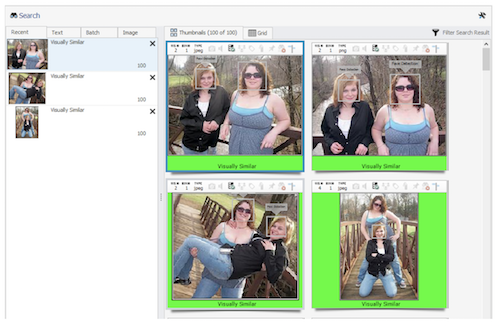
Vector image hashing is built into Griffeye Analyze and tells if photos are similar. It will then bring them back in order of similarity.
It is also possible to take an image from outside the case, bring it in, and search internally against that file. For example, if a child exploitation perpetrator has a child of their own, you can bring in a non-exploitative image of that child and run similarity matches to see whether the offender has been abusing their own child as well. Another option is for a crime scene officer to take pictures within a house, then upload those files to Analyze and classify them as comparison images, and then run similarity searches against them. For example, you may want to import an image of a child’s bedroom to see whether indecent pictures have been taken in a specific room.
Sometimes it’s not immediately obvious what is being shown in an image; perhaps it is not of a high quality, or maybe it has been deliberately altered to obfuscate it. Shadow Boost is one way around this: go into file view and click on ‘Shadow Boost’ to bring out more detail in a dark photo, which may help you to identify a victim.
Cicking on the magnifying glass turns your cursor into a zoomer, which zooms in on speciifc bits of a picture. You can then annotate parts of the file for someone else to review, for example by drawing a box around a suspect, or highlighting a specific location in a photo. If you’re looking for a quicker way of doing this, you can simply add a comment to the file itself, and the next examiner can filter by files that have comments.
Active Zoom is activated by hovering over an image, then holding down the Shift key. It will zoom in so you don’t have to expand into file view, you can just take a more detailed look at the thumbnail and decide if you need to look at it further.
Individual files can be copied externally, or you can create an EnCase export which creates a dot hash file, or a CSV or Excel spreadsheet. You can also create an automated report, which will download as a document with a summary at the top.
Everyone working on child exploitation investigations in the USA is required to submit their findings to the National Center for Missing and Exploited Children, and this is built in to Analyze: you can easily export the files, organise them and then send them out for upload.
Griffeye’s Analyze DI Pro is a fantastic tool and I can definitely see how it would make a huge difference to investigative timelines, especially in child exploitation cases. It is straightforward and easy to use; although I was given a demo of the software, it is intuitive enough that I think it would be possible to pick it up without any training.
Griffeye Brain is a particularly exciting development and I look forward to seeing it in full; I believe this could really help with the previously unknown unknowns in child sexual abuse cases.
The only thing I wanted that wasn’t currently available was a timeline view, which has apparently been requested a few times by users so will hopefully be available in a future update.
Overall, I would recommend Analyze particularly to investigators who specialise in child exploitation cases, but it would be useful for triage and data processing across all aspects of digital forensics. I look forward to seeing the next developments!