Reviewed by Jade James
ADF Solutions is a leading provider of intelligent digital forensic and media exploitation software. ADF’s tools are used for the processing and analysis of computers, external drives, mobile devices and other media storage such as USBs and memory cards.ADF Solutions provide four main tools:
● Digital Evidence Investigator (DEI) – designed to meet both forensic lab and field triage requirements. DEI is used by both forensic examiners and investigators who have had training to run and configure the tool (configuration of the tool is only available in advanced mode). DEI also offers advanced search configurations and separate authentication and collection keys, which allows the user to scan multiple devices at the same time.
● Triage Investigator – designed for field triage requirements and primarily used by investigators with limited digital forensic training. The basic user mode allows for ease of use and limits risks posed by users. Triage Investigator also offers separate authentication and collection keys, which allows users to scan multiple devices simultaneously: particularly useful on scene.
● Triage-G2 – designed to meet military, intelligence and Special Forces media exploitation requirements. The tool has a proven track record supporting site exploitation operations (including DOMEX, MEDEX, Tactical Media Exploitation, and bio-metric identity). Triage-G2 can be used by non technical operators and can be deployed for reconnaissance on a small, portable USB key.
● ADF Mobile Device Investigator (MDI) – designed to be operated by front-line police, sheriffs, school resource officers, field agents, and investigators. With this tool you are able to quickly and easily collect digital evidence from iOS and Android devices, by connecting a suspect device via USB port to perform a logical acquisition.
In this review we will be focusing on Mobile Device Investigator (MDI). According to ADF, MDI is completely user-friendly and requires minimal training. The tool can also perform fast logical acquisitions: up to 4GB of data per minute (depending on system requirements). You can search for keywords and hash values during the logical acquisition, although this may slow down the process. You can also perform quick reviews of your data using the picture gallery, video frames, comprehensive filters, VICS/CAID auto categorisation, data deduplication and whitelist elimination (a whitelist is a list of all programs, software, and system files that are allowed on a computer).
ADF MDI perpetuates the in-depth analysis of data using visual classification, timeline view and view links between files of interest and user activity. Finally, using MDI you are able to create custom reports with tagged data; export reports in .pdf, .html, .csv or VICS formats; and share them using ADF’s standalone viewer.
ADF MDI requires a minimum operating system of Windows 7 64 bit, Windows 8.1 64 bit or Windows 10 64 bit, with at least 4GB of RAM and 20GB free of hard disk drive capacity. ADF MDI supports Android devices which are version 4.0 or later and iOS devices which are version 10 or later.
As a user with limited experience and training myself, using ADF Mobile Device Investigator it was useful to know how to prepare an Android and iOS device for acquisition.
When preparing an Android device, always make sure that you know the password/pattern to unlock the device, isolate the device from the network by placing it in airplane mode, prevent auto locking of the device, activate developer and USB debugging mode, authorise the execution of apps from unknown sources, and ensure the USB connection mode is set to transfer files.
Preparing an iOS device has near enough the same process in which you must know the passcode to unlock the device, place the device in airplane mode and prevent auto-locking, but you also have to trust the host computer when prompted on the device.
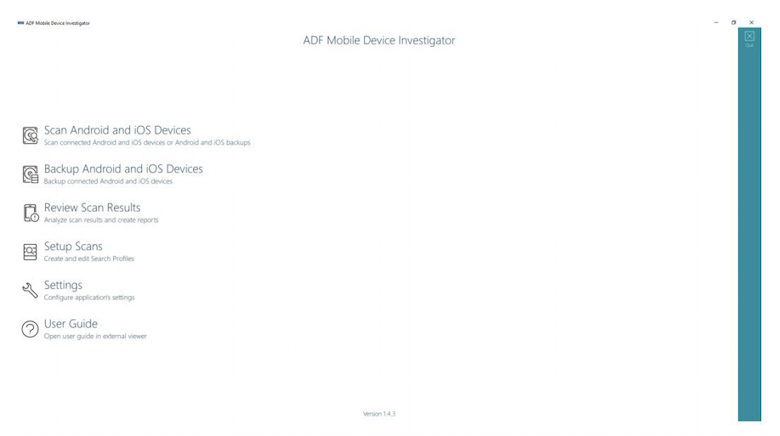
When you have successfully installed ADF Mobile Device Investigator, you will be presented with a variety of options to choose from.
‘Scan Android and iOS Devices’ allows you to scan connected Android and iOS devices or backups of Android and iOS devices. ‘Backup Android and iOS Devices’ enables the creation of a backup of connected Android and iOS devices. ‘Review Scan Results’ allows the user to review and analyse scan results from previous scans. ‘Setup Scans’ allows you to create and edit Search Profiles and Captures.
‘Settings’ allows the user to specify the default locations of Search Profiles, scan results, Android/iOS backup, exported reports and the license backup. Tag names can also be modified here. It is also possible to view and delete backed up licenses.
You can also download a PDF copy of the User Guide on this screen.
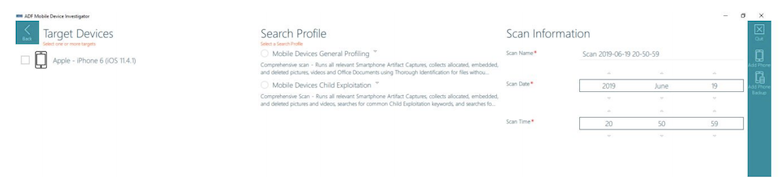
Selecting ‘Scan Android and iOS Devices’ will present you with the screen above. If you have successfully connected a target device, it will show up in the menu. You will need to make sure that the device has enough battery and that it has trusted the host system. You are given the choice of two predetermined search profiles, which are configured around general profiling and child exploitation profiling. Mobile Device Investigator allows the creation of custom search profiles containing a combination of default and user-created captures. Copies of the default search profiles may also be modified to suit operational requirements.
Once you have selected a search profile, you are also able to enter some basic case data, such as the scan name, date and time. Located on the far right of the screen is the ‘Function’ toolbar, which gives you the option to add a phone or a backup, if you have not already done so. You can then scan the target device.
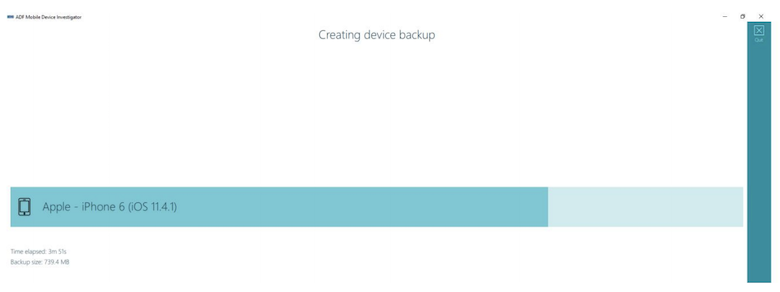
ADF MDI will initially create a backup of the target device. At this stage it will present you with basic information such as the amount of time it has taken so far to complete the scan and the amount of data it has created for the backup. If you do not have enough capacity within the data path selected for the scan results, you will be presented with an error, in which case you can cancel the scan, reconfigure the path in the settings and try again.
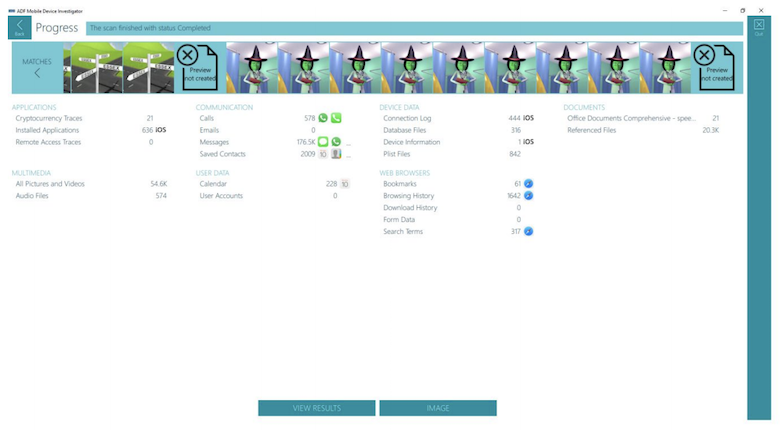
Once the scan is complete you will be presented with a screen similar to the screen above. From here you can either view the results of the scan or image the device.

Viewing the scan results will present you with the screen above. The ‘Scan Information’ section details the scan name, date and time; the system date and time; and the viewer’s timezone. The ‘Search Profile’ section shows the profile that was used to generate the scan results and any associated notes on the search profile.
The ‘Statistics’ section shows the scan duration, status, number of files collected, and the application and version number used. The tag statistics are also shown if any exist.
From the ‘Summary’ page, you can either use the ‘Capture and Navigation’ toolbar on the left hand side to analyse the scanned data, or use the ‘Captures’ section. The ‘Captures’ section lists the captures used in the search profile, and alongside each capture the number of results found. The capture names are hyperlinked – by clicking them, you can see the results of the capture.

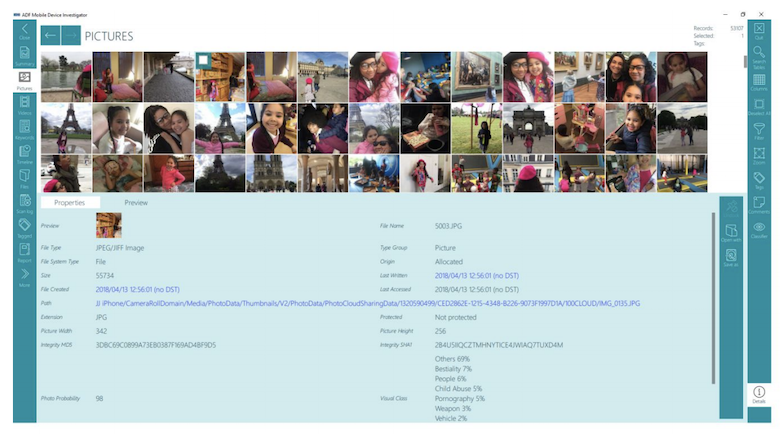
To view images, you can select the ‘Pictures’ tab or use the capture link for all images. From here you are presented with a gallery view. Each image will have metadata where applicable. This could include the file creation date, which is hyperlinked and if clicked will bring you to the entry on the timeline; the file path, which is also hyperlinked and if clicked, will bring you to the ‘Files’ page where you can view folder content; the hash values; the Photo Probability score, which indicates how likely it is that the file is a photograph; the visual class; and so on.
The visual classes are:
● Bestiality
● Child Abuse
● People
● Pornography
● Portrait
● Scanned Document
● US Currency
● Vehicle
● Weapon
● Upskirting
● Others (various innocuous class types)
Each picture is processed by the classifier in order to determine how likely it is to feature within a particular class and is given a probability score. A high visual class probability score indicates that the picture concerned is more likely to fall within that class, however It is not an exact science and there can be some false classifications. Visual classes can be helpful when used as filters, but they can also be paused if visual classification is not required.
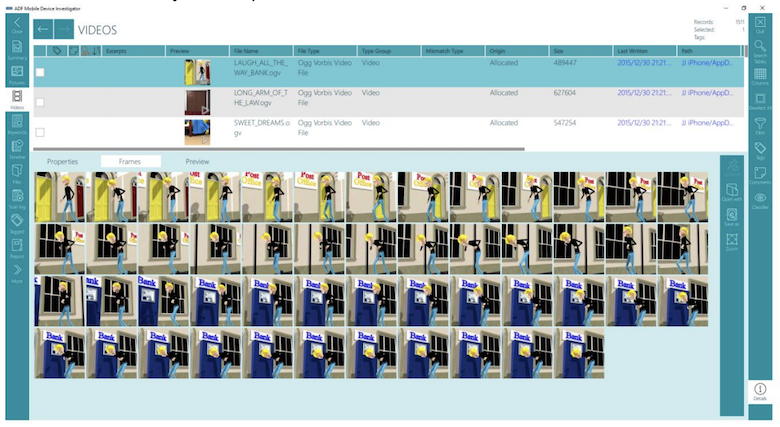
The ‘Videos’ page is very similar to the ‘Pictures’ section. Here you are given the videos found on the target device in a list view. The columns of the table can be rearranged and results can be sorted differently by double-clicking the column headings; the same metadata is given about the video file if applicable. On this page you also have the option to look at 50 frames which are taken at intervals throughout the video file, and you can preview the video.
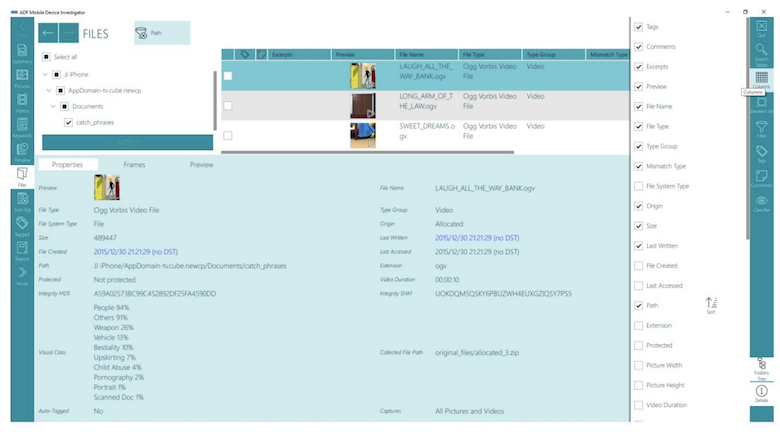
The ‘Timeline’ page lists all file and artifact records that have timestamp information. The ‘File’ page lists all files and folders encountered on the target device. The ‘Files’ view can be viewed with or without the folder tree displayed. You can also change what data is presented to you by selecting or deselecting which columns you would like to view. At any time throughout the investigation, you are able to search tables using keywords, which is very helpful but can return a long list of results.
Note from ADF: Our search function is designed to search all tables and metadata for the entered word As with any keyword search specificity will help reduce the amount of hits. Example – Searching "Delmar" may return a few hits, but searching for a generic word like "black" may return many.
The ‘Report’ view allows the creation of reports in various formats (HTML, PDF and CSV); the creation of a Project VIC JSON file (and an export of the associated files); or the creation of a standalone Viewer report.
As a user with limited experience and training with ADF Mobile Device Investigator, I found it very easy to install and use. You are given a plethora of data in tidy tables which you are able to search and filter accordingly. The searching, tagging and commenting functionality of the tool is very instinctive. The hyperlinks on all pages make it very easy to navigate through the data from the target device.
However, if I were using this tool as a frontline officer who perhaps had a limited amount of time to make a case, it would be difficult to paint a picture with the data provided by the tool. For example, you are given valuable data such as pictures, videos, messages, contacts and so on, but it is difficult to differentiate which data comes from different apps. It also would have been good to view conversations via WhatsApp or iMessage as a whole, so users could see the sent and received messages together more fluidly as one conversation. With the Timeline view, it might have been beneficial to see a more visual representation of the scanned device and its captures, or have files with similar timestamps subdivided within the table.
Note from ADF: Our users have asked us to show all artifacts of a similar type (e.g. Messages, Calls, Browsing History, etc), in one common place to avoid unnecessary navigation or potentially missing information. This is the reason we created these normalized views that combine all apps in a single place. In the case of Messages, once the relevant message is found, our users set filters such as Source=app and Message Thread to focus on that conversation.
In the case of pictures or videos, our users can navigate to the connected artifacts with the Linked Artifact property.
On the whole I would recommend this for investigators who do a lot of work with image and video files, and especially for teams that include a mixture of technical and non-technical investigators due to the intuitive nature of the tool.
Find out more and order your copy of ADF MDI here.
About The Reviewer
Jade James BSc (Hons) is currently a Digital Forensic Investigator at the Serious Fraud Office. She has previous professional Digital Forensic experience from working at IntaForensics, Home Office Centre for Applied Science and Technology and the City of London Police. Jade has gained experience from conducting Computer, Mobile devices examinations, Drone Forensics and has been involved with ISO 17025 & Quality Standards both as a Digital Forensic Practitioner and Quality Manager.