Join the forum discussion here.
View the webinar on YouTube here.
Read a full transcript of the webinar here. Hello everyone. My name is Jacob Hulsey, I will be the presenter today, and my contact info is on the screen for you. There is also the information there for technical support. So if you have tracking issues, questions about phones, or if there are any issues with the software, the support email is great, so please don’t hesitate to reach out to us.
OK. Great. So, the agenda today, we’re going to keep this brief, but hopefully informative for everybody. We’ve made a number of changes to the programs, and I think you’ll be happy with the results. You can see the list that we have there, that we’re going to talk about, and we’re going to move on to the XAMN developments.
Let’s go ahead and just jump right into it. And the first item here is going to be talking about XRY and the user interface.
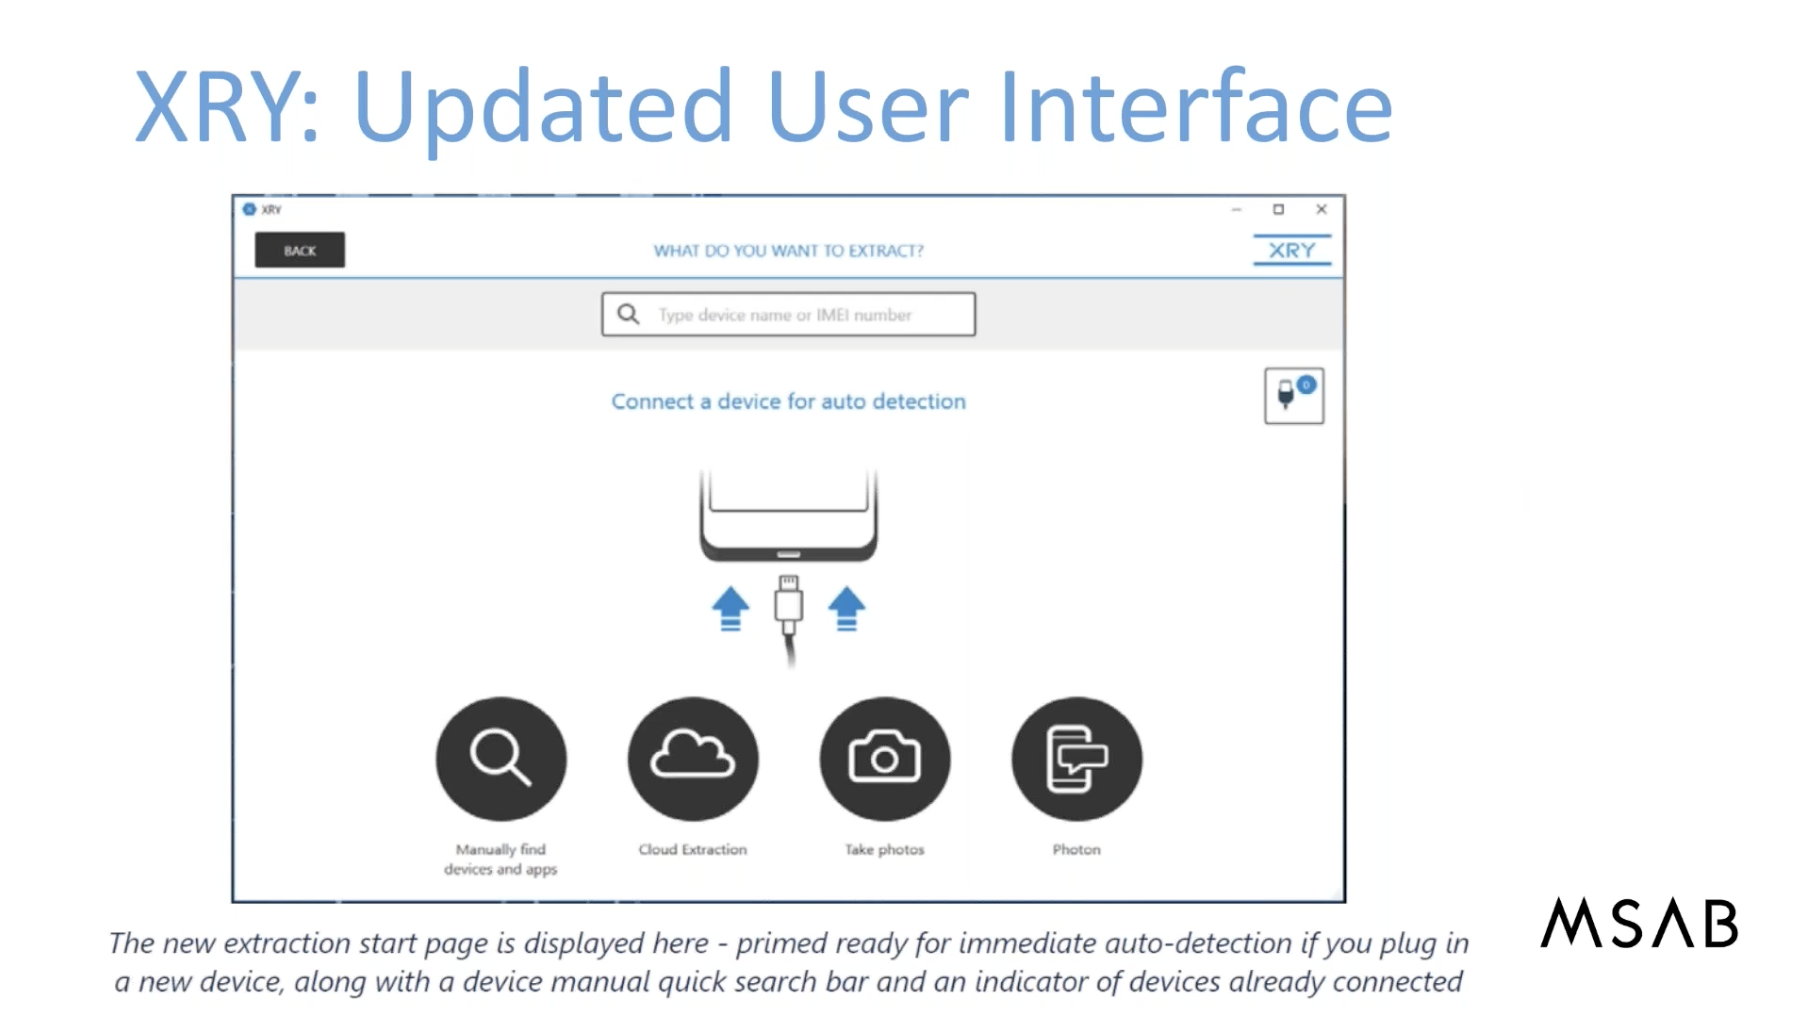
So the extraction interface, we have revamped it, we’ve made it more efficient, easier to plug a device in; and our auto-detect feature recognises the device that you have much faster, much cleaner than it used to be in the past. So there’s a little screenshot here, but I’m actually going to talk a little bit about the program, and I’m going to walk everyone through this.
On the home screen of XRY, you can see in the upper right below the blue banner, I’m running version 8.0.1, that’s imoprtant. Again, always remember that you’re running the latest version.
And then, we always recommend starting a new empty case before you do an extraction, the reason being that you can organise all your extractions into one. Even if you’re only doing a single one-off extraction, create your case folder, because later on, if you want to add extractions to that case, it’s easy to do so. It’s a glue that holds everything together, and then when it comes time to do analysis, it can be comprehensive across the board, across those extractions in that case.
So I’m going ahead and firing up this case ID, I create my case and it brings me to the case overview page, where I proceed in the lower left with adding an exhibit. Click on ‘OK’, and then it presents with this extraction wizard.
Right now, I’m going to plug in an iPhone XR, and you’re going to see how the autodetect picks it up. In the upper right there’s a little square dialogue box here. If I click on that, that kind of shows you our old view, that horizontal dialogue box for connecting a device. But for now, what I want to do is show you the new interface.
So I’m going to go ahead and plug my device in, and you’re going to see it’s going to identify as an iPhone XR. It’s giving me four options: so if XRY can’t recognise the exact model number, it’s going to give you some suggestions. It knows that it’s an XR, but it may be one of these four variations. Do your homework of course, make sure you know what model you have in front of you. Once you know that, you can go ahead and click on ‘Continue’ and proceed with the extraction.
But all in all, that autodetect capability has been sped up, it’s more accurate, it’s going to make your life a lot easier. If you plug a device in that we don’t have direct support for that model number — in the past, if you plugged in a phone that we didn’t have support for, it may have not given you a recommendation — but now it’s going to tell you that maybe you should use a generic profile. We have a lot of powerful generic profiles covering thousands of devices. So it could direct you to a generic that’s effective for that phone. So I think you’re going to find that that’s a vast improvement.
Let’s go back to the Powerpoint. And the next slide here is going to be talking about manually searching for devices. So, if you don’t want to use the autodetect capability, and you want to type in the model number, that has also been improved. We’re now using Google’s search methodology — so I think everyone likes the way Google, at least, operates on that front — making sure you’re not missing anything if you mistype.
So you can see the examples here of what that means. If you type in the naming of a device in the wrong order — like if you type in ‘Galaxy’ and then ‘Samsung’ — it’s still going to find the hit on that. If you put in the model number later on, it’s still going to find it. If it’s cap sensitive, it’s not going to get tripped up. If you put things in quotation marks, it does have to find the exact thing that you typed, in the way that you typed it.
You can also eliminate. In that example with the “good people” in quotation marks, you can eliminate that wording from your search by doing the minus sign and then the quotations. So it’s going to make things a lot easier, and you can be assured that you’re not mistyping something and not getting any result in the device manual.
So I’m going to actually go into XRY, and once again, you’re presented with this interface. If I click on the search bar here, you can see I have some recent profiles that I’ve used in this list — that’s a new development as well. That way, if you use the same profile over and over, it’s going to put it at the top as a reminder. But if I start typing in, let’s say “S7” and then “Galaxy” — if I can type correctly — you’re going to see that it’s going to populate the results even if the order in which I’m typing is incorrect.
So hopefully that gives you confidence in the ability to search for a device. It’s going to be more accurate, and also hopefully it’s going to speed up your work. So that’s important to note.
Alright. Next thing we’re going to talk about is the ability to do app downgrades in Android logical extraction. So hopefully everyone is aware that we can do third-party app downgrades on the latest Android OSes. This is huge. This allows you to not miss data that’s critical for your investigation, because, for example, if Facebook Messenger updates their app today, then of course we have to reverse engineer that and it may take us some time to do so.
So what we can do on the device is, we can downgrade the application to the version that we could exploit, then we pull the extraction, and then we restore the app back to the original format. Pretty clear process, it’s very forensically sound, because we actually store the APK in a subfolder of the extraction. So you’re able, if something goes wrong in the restore process, you actually have the APK there and you can push it back to the device.
Best practice for mobile forensics: you never want to do an app downgrade first. You want to do a baseline extraction, make sure you get an extraction with no app downgrades, and then if you need to downgrade some applications then you can do that.
So I’m going to walk through the process for our app downgrades. We’ve changed it so that it actually has step-by-step instructions; it gives you some warnings; it gives you some tips and tricks; and then you can actually target which apps you want to downgrade. So let’s go ahead and walk through that together in the XRY program.
So for this example, I’m going to plug in my Galaxy S8. And you’re going to see once again that XRY is going to detect it. So you may see, in some cases where… if you look at those two profiles, you see ‘Community Verified’ in parentheses at the bottom, and you also have a ‘Verified’, and you may be wondering what the difference is.
‘Verified’ means that that device — that specific model number — is in our Stockholm office with our development team. It’s on the shelf, and if you have that phone in your hand, and you have a problem with the extraction, our team, our technical support team, can actually pull that device off of our shelf at our headquarters and troubleshoot with you. And it’s actually gone through that profile — that G950u has gone through our rigorous internal tests completely.
If it says ‘Community Verified’ it means that another law enforcement entity around the globe has used this profile successfully on that device. And we haven’t been able to fully run it through all of our tests, but we’ve looked at the log files, and we’ve given it a thumbs up, and we’ve added it into the manual, because we don’t want to delay giving you support for devices or profiles that may work effectively. It takes a while for us to do all of our internal tests, so we don’t want to hold you up. But rest assured that another law enforcement entity has used it — it’s not a private company, it’s actually a law enforcement agency — and we have looked at the log files, we just need to run it through some more internal tests to verify everything. But it’ll say ‘Community Verified’ in that case, versus ‘Verified’: that’s the difference.
If I choose the verified profile, I can see my extraction options on the right-hand side. Now, this is an important step — it’s not always clear to everybody — but these extraction profiles can be edited, and you can actually create your own custom-made extraction profiles. You either click on the lock box in the upper right; and if you click on that lock box, you can see that I can edit the extraction profiles, or I can create my own with this new action.
So if I select ‘New action’ it actually gives me the ability to create a custom triage profile from scratch. You’ll notice on the left-hand side I have categories of data. I can tell the program to only decode certain categories of data. The great thing here is you’re always going to pull a full extraction with XRY. You’re never going to leave anything on the table, but you can specify what’s decoded. Why would you do that? Well, because it drastically speeds up the process and how long you have to wait for that phone to dump.
So I can change a profile here, and actually target specific categories of data, if I know that that’s where my evidence resides. Or maybe I have consent from a witness and they say “You can only have this content off my phone, but I’ll provide it for the case.”
It’s important to realise how these profiles are created. I’m going to spend some time on this today, but if you need help creating your own specialised profiles — this can be very advantageous — reach out to me, I’d be happy to work with you to create your own.
As far as the app downgrade goes, what I’m actually going to do is I’m going to cancel this one, and I’m going to go back and look at the logical full read option. So the logical full read, you can see that under the finish options — this is the decode steps — we have the ability to, well, turn off decode entirely by clicking ‘Do not auto-decode’. That’ll create a profile: if I just save this right now as ‘No decode’, that gives me a powerful profile to use in the field, or in a time-sensitive situation where I can dump a phone, but I want to get it done as fast as possible. XRY will extract everything, and then you can give the phone back to whoever needs to have it back.
Later on, when you get back to your office and you have more time, then you can run the decoders. The decode takes the majority of the time, so it’s very powerful if you’re doing in-the-field work, or any time-sensitive situation.
Also, one of the finish options, you see the ability to generate video thumbnails. Now this is great for if you’re looking through a video, maybe working ICAC cases, child exploitation, and you want to make sure that a video doesn’t have anything illicit in it.
So what you’d want to do… it actually breaks out the video into a gallery view, and it takes ten percent increments of the videos and puts them in a nice gallery format for you, so you can actually see what’s going on throughout the video, and you can tell that nobody’s hiding anything that shouldn’t be there. It just saves time.
Content recognition is right under that, and that’s simply image recognition. So we will put images in categories for you, like ‘people,’ ‘weapons,’ ‘drugs’ and so forth.
For the app downgrade, what I’m actually going to do is I’m going to look at this bottom section where it says ‘App downgrade prompting.’ And you can see by default it says ‘Prompt for each app.’ So it’s going to ask me, “Do you want to downgrade this application?”
Your system; your XRY; your logical full-read profile; should automatically have that in there. I would go in, if I were you, and see that it’s turned on. You can see that there’s an option for ‘Always downgrade,’ which I wouldn’t recommend; or ‘Never downgrade.’
You also have the ability to change the Android extraction options, so if you want to just pull the backup and not the agent — so maybe you just want a third-party app that’s going to be found in the backup — you can actually create a profile where you’re just pulling from the backup apps. And we’ll talk more about that in a second.
But I’m going to go ahead and select ‘OK’ because I do have the prompt for each app, for the downgrade, so I’m going to select ‘OK.’ So I’m going to proceed with that logical full read.
And now I’m presented with these step-by-step instructions that have changed in XRY. So it’s going to tell me that I can downgrade some applications, and then it’s going to give me a warning that it does require a reboot, a restart of the device. If you are doing app downgrades, it’s going to restart the device. You want to disable any passcodes or lockscreens before you do this.
And there’s also some best practice advice there as well. You’re presented with the option to downgrade some applications; downgrade all; or downgrade none. So I’m going to select ‘some’ here. I’m going to go to the next screen: here’s some more warnings, some more instructions, ‘Turn off all pincodes and passwords’, how to do that, put the phone in charge only mode, and then I’m going to proceed.
I’m presented now with a list of applications. This is not what’s on the device, because XRY has not done anything to the device yet. This is a list of applications that we can potentially downgrade. So there’s a lot of options in here. For this example, maybe I want to just grab Facebook Messenger and Instagram. If these are the two apps that I want to downgrade and I don’t want to do the other ones then I can go ahead and click on ‘Next’, and then it’s going to take me to my Case ID, put in your exhibit ID and operator, and you can begin extraction.
So, pretty straightforward. The step-by-step instructions hopefully make things clear for you, and give you the warnings and the tips. Remember: always do a baseline extraction first, before you do any app downgrades.
So this slide I have up on my screen now, it tells you that we do store that APK in a subfolder in the directory as XRY file, so a little bit of reassurance, a reminder there. And then there’s a few more notes on what we’ve improved with the app downgrade process.
All of these slides, they are in the release notes. The release notes for XRY version 8 are found on the customer portal, right under the download link.
Before I move on to the iOS improvements, I’m going to talk about targeting certain apps for decode. So not the app downgrade, but maybe you know that your evidence is sitting in a third-party app, or you have consent from somebody to just grab, maybe, WhatsApp data. I’m going to show you how to do an extraction in XRY where you are only going to be decoding that data.
So let’s jump back into the program. And this time I’m going to create a new customised profile because there is not one set up by default that will do this. So click on the lock box, select that new action, and then I’m going to create this profile action, and I’m just going to call it ‘Targeted apps’. And then under the finish options, I’m going ahead and select[ing] the prompts for which apps to decode. That is going to allow me to specify what I want XRY to do.
Once again, you’re still going to get a full extraction. So if you’re missing things after the decode process, you can go back later and re-decode the entire XRY file for the rest of it. But for right now, I want to prompt for which apps to decode.
And then maybe all I want to do with the device is I want to grab the backup. I don’t want to grab the file system or the agent; the backup is where the third-party apps are stored, so that is the only extraction I want to do right now.
This is a good example: if you’re talking to a witness and they say they only want to give you some messages that they captured that may help your case. So, prompt for which apps to decode, just do the backup, and go ahead and proceed with this.
I’m going to create this profile called ‘Targeted apps’. And once it’s finished processing, it’s going to put that in my list of profiles to use. So we’ll give that a second to fire up.
In the meantime, I’m going to go back to the Powerpoint, and I’m going to talk about the iOS improvements.
This is just kind of a highlight that we wanted to make available to you: the idea that, if you put a password on the iTunes backup encryption; if you password-enable it; if you enable that, it’s actually going to take more time for an extraction. We’re trying to give you the option that you can reduce the extraction time of an iOS device via the iTunes backup.
So we pull the information from the iTunes backup — the only tool that doesn’t is GrayKey, that most of you are aware of — I will say that if you do have GrayKey, and you’re pulling the entire filesystem — the backup, the keychain, the memory — you can drop those into XRY for decode. You still need to take a GrayKey extraction into a forensics tool to decode the data. We do a phenomenal job, our iOS decoders, so: take that file system in, leave it as a zip file, you don’t need to unzip anything in XRY. If you actually search in our device manual, we have a dedicated GrayKey profile.
This little chart here tells you that, if you enable the backup encryption, then once again, it takes longer to do the extraction in XRY 8.0, but you are going to recover more artifacts, such as the keychain and Apple Health. If you do not enable the backup encryption, you’re saving about 33% time, but you’re going to be missing out on some of those keychain and Apple Health artifacts. It’s your preference: just be aware that it will take longer, and those are your options.
So if you have an iPhone in your hand, and it’s unlocked, and you want to pull it with XRY: maybe it already has a password on the backup, and you don’t know what that password is but you’re already into the device, you can reset all settings on the phone. It’s not going to manipulate any user data, it’s just going to set a reset [of] some of the formatting on the device. You’re not going to lose user data. And then XRY, if you tell it to enable the backup encryption, it is going to set a password to it — I think the default is ‘1234’ — and it’ll proceed. It’s going to get that keychain and Apple data for you.
There’s a little footnote there also for Facebook and Facebook Messenger: it’s essentially saying that we’re back up to par on getting all the information off of those apps. We have to reverse engineer every new app release, because things change from the development side, and we have to keep up with it. So that’s why we do monthly releases of XRY, in order to change the way we handle third-party apps, devices, and so forth.
OK. I’m going to address one question that came through. So this question says: If I have already conducted an extraction by not choosing ‘New empty case,’ can I take that extraction and move it into a new empty case folder?
Yes, you absolutely can. So once you create a case folder from the XRY homescreen, you can drag and drop XRY files into it. You can remove them; and it’s actually logged, so the case folder holds everything together — you’re going to see the .xry case extension, that is the glue that holds all the extractions combined. If you remove extractions, or add them in, there is actually a log file of what you’re doing, which is good because you want forensic integrity for court. And we do a full log file for extractions, and we also do a full log trail for case management.
But yes, you can absolutely create a case folder after the fact, and then put a bunch of XRY case files under that case folder.
OK, the last slide I have, and then we’re going to move into XAMN, is going to be the end-of-life announcements. So just keep in mind XACT is our hex editor, that is end-of-life now. It’s been replaced by XAMN Elements, which is the XAMN program that I’m going to show you today. Elements is just a separate level of the program that you can access. If you have an XRY physical license, you have access to Elements.
It’s got a full hex editor; it’s got tons of features: everything XACT had, plus some more. So if you guys want to do any manually carving of data with our hex editor, and you’d like to learn how we use it, please reach out to me directly: I’m happy to set up a session with one of our engineers, and they can walk you through XAMN Elements.
You see also the notes for XRY Viewer, and then we will stop support for Windows 7 January 14th 2020. That’s in line with Microsoft, as well: they’re stopping support, so that’s kind of a given, there. Just keep those things in mind.
Alright. So here is what an XRY case folder is going to look like in a Windows path. So you see I have a number of extractions there. And this Narc225.xry case extension is the glue that is holding everything together, that .xrycase extension. You see the individual .xry files, we have some tokens in there, and we also have a few iPhone extractions.
So as you create a case folder in XRY, this is how you’re going to see it in Windows. Once you’re ready to do the analysis, all I do is double-click on the .xrycase, and I’m presented with the option to either look at things in XRY — which you would want to do if you did a ‘no decode’ and you wanted to go back in XRY and re-decode something, you could do that — but for the next part of this presentation, we’re going to go into XAMN.
XAMN is going to be how you do your analysis. And XAMN has changed quite a bit. It’s easy to use — I’m happy to set up even more time with you guys later on after this, if you want to do a full session on XAMN — but I think you’ll see it’s a pretty intuitive program.
So I’m going to choose XAMN, I’m going to launch that up. Alright, so XAMN is firing up. When it does so, you’re going to see that the Narc225 case that I have, which is just some example files, so that is highlighted. It’s noted by that briefcase icon.
On the left-hand side of XAMN is my case history, or extraction history; I’m just going to close that out. And what you’re looking at in the centre column is the Narc225 case folder: all the extractions — numbered exhibits one through five — are included in this case.
The artifact information here at the bottom: that’s a comprehensive look at all these extractions combined, so you know what was captured.
If I just want to look at a specific extraction — so I want to look at this iPhone X — if you choose that, the artifact at the bottom information changes. Now I’m just looking at that iPhone X extraction.
If I want to look at the log file — contacting technical support for an issue, and they ask for a log file — you choose the individual XRY file, and then you want to go ahead and toggle over to the log here. And now you can see that you can search this log, you can print it, you can save it as a PDF, and you can show it to our support team.
The case folder — if I highlight that once again — it does have a log file as well. And it’s going to tell you if an extraction was added and removed from the case, it’s going to manage everything for you.
On the right-hand side of XAMN, you have quick views. One of the changes that we’ve made in the new XAMN 4.3 is adding a new option for passwords. So these quick views are a nice easy way to launch into certain criteria, based on what you need. If you want to look at just pictures, we have a quick view for pictures which opens up everything in the gallery view. And then we have, you know, if you want to see [the] last week of activity on those devices and extractions, we have a quick view for that.
These quick views, you’re going to see that a lot: these are set up here by default. You can manage these, though: I’ll show you how to remove quick views, or add your own quick views, based on your own search criteria. And if you have a certain way of doing your work, and you want to save it, so you don’t want to create the wheel every time, you can actually create and save your own quick views. You can share quick views with other users, and we’ll talk about that here in a minute.
I’m going to go ahead and click on ‘Passwords’ right now. And I’m going to launch over, and into those passwords across those extractions.
I’m hoping that everyone’s used XAMN, but if you haven’t, I’ll go over real quick the basics of how the program operates.
You’re going to see that, on the left-hand side, we have filtering. We have a lot of filters that are available for you. So, starting from the upper left, I have a ‘Text’ filter where I can start typing in a name of a suspect, or something of interest to me, and it’ll search across all of the extractions for that information.
I have Categories, as filters: these are colour-coded. I have Tags, once you start tagging items. I have a Time filter. And then right now, you can see that I have actually applied that Passwords filter. So this quick view, I immediately launched into the passwords. You can see in the middle column, I have four artifacts that have passwords. If I click on one of those, you can see details [in] the metadata pane on the right-hand side. So the password for the private photo vault is ‘9876’. This is just an easy way to go into that critical information, if you need the passwords for accounts.
The quick views are on the very upper left. If I drop down from this menu, you can see that I can immediately jump to those quick views. So if I want to jump over to a gallery view of the pictures, I select that quick view, and immediately it changes to the gallery view. And it’ll show me all of my pictures.
And immediately it’s going to sort the pictures by file size, putting the largest pictures at the top of my list, so that, you know, those stock images that we talked about, it’s putting them at the bottom.
OK. Let’s go ahead, and I’m going to do a couple of examples of filtering, so that everyone gets used to this. If you noticed before, when I applied the passwords quick view, that one of the new features in XAMN is dynamic artifact counting. So it is going to tell you where those passwords are residing on the devices, those extractions.
You can see I have two artifacts in the device, under ‘Network Information,’ under ‘iOS Apple Networks.’ So you can just drop down there to see how this fits. I have two artifacts under ‘Security’ that are found within these two accounts.
So dynamic artifact counting: it’s going to help you a lot, because when you’re applying filters and searches across evidence, it’s going to show you where these artifacts are sitting, so you know where you’re capturing everything from.
I’m going to go ahead and I’m going to close out of this tab — the passwords quick view — and go back to the Start screen.
And this time I’m going to actually open up all artifacts; that’s the quick view on the right. ‘All artifacts’ is not going to apply any filters, it’s just going to give me everything. And I’m going to do a few examples that I think [are] going to make your life easier.
So the Time filters on the left-hand side: we’ve released the latest version of XAMN to include this ‘Set custom time’ field. Now that, we’ve always had this field, but it’s kind of been hidden, it’s kind of been in the dots next to ‘Time’ where it says ‘Edit’ and then you can edit a date and time range. So, you know that an incident happened at a certain time: you want to apply those filters. Maybe you have a warrant, or a judge, saying “You can only extract data, or look at data, from this date and time range.” Well, this is how you would apply those filters.
We’ve created this ‘Set custom time’ view, it’s a little more obvious. If you click on that, it’s going to open up that same dialogue window where you can choose on the calendar the dates, and then the time where you want to look across… do your analysis.
In the Text box, you can see that if you start typing in a name, we are actually… the program is going to give you suggestions, what to type in there, based on what it knows it captured across the extraction. So it’s intuitive; it’s kind of like Google does, when you start searching on Google. Keep in mind you can also access the Text search by doing Ctrl+F on your keyboard, just like you would ‘control-find.’
And then if I type in the name ‘Freeze’ once again, and I click on ‘OK,’ the nice thing about this search [is] if I do not select ‘Match whole word only’ and hit ‘OK’, is it puts these wild card characters, these asterisks, at the front and back end of the word ‘freeze’. So it shows me all possible results of that name. This is nice if you have a partial name of a suspect, or a nickname, or you don’t have the full spelling. You can put in the partial, and it’ll give you all possible options.
So if I type in the name ‘Freeze’, I have 56 artifacts with this suspect’s name in it. And this is across the board. So if I choose this artifact here in the top row, you can see that this is an Apple contact. And it’s going to populate that in the metadata on the Details pane on the far right side. A name, a phone number, an email address… and maybe this is the suspect I’m looking for.
This brings me to the next feature in XAMN — and I think this is really powerful — is the ability to, what we call ‘pivoting off metadata.’ Creating an advanced filter, or special search, based on anything that you see in the metadata. So if I see a phone number that’s of interest to me, or an email address, I can say “Hey, wait a minute, I want this program to tell me everything related; every artifact that has this phone number in it.”
So if you do a right-click on the metadata — anything in the metadata, this could be lat or long, to do a geographical search; it could be a name or a phone number — and then basically, you can create… since I clicked on the phone number, it said “Do you want to create a phone number filter?” And I’m going to do that, I’m going to say yes, I’m going to put it in a new tab. And it’s going to open up and populate a new tab for me, specifically targeting that phone number, and looking at the data that has that phone number in it.
So in this example it only has that phone number in one place, so that’s the result it gives me. But if it had had that phone number all over the board, it would have shown me a lot of artifacts that have that phone number in [them].
So, keep that in mind. Definitely don’t forget to be able to do those specialised searches off the metadata.
At this point I’m going to talk about the upper… the very very top menu of this program. So three icons over from the very top, you have the ability to import into XAMN. You can import binary files; you can import call data records; and you can also import UFED files. So historically, if you have a lot of UFED files, and you want to bring this into XAMN because you like the way this program operates, and you’ve got XRY files and UFED files together, you can easily do that. You just select ‘Import UFED’ and we’ll convert the file to XRY, and then you’ll be able to look at that and cross-analyse.
If you guys use iVe for vehicle forensics, we’re the only partner they have. They can export out into the XRY format as well. So you could potentially drop in vehicle data in here; UFED files; XRY files; any binaries; CDRs… all of [those] data sources you can drop into XAMN and do your analysis.
On the far right of the top menu, we have the Help file. And the Help file is now in HTML format, it’s no longer PDF. So it makes it easier to navigate. Click on the Help file, it’s going to launch a window up for me. And you can see that you can search through this HTML.
You can also… we have training videos in this Help file that you can watch. So you can expand… there’s a video here for just getting started with XAMN; for options and settings — so maybe you want to change the reporting features, how the reports look — there’s a video for that. There’s a video here for importing into a case: kind of what we hit on earlier, just a little more detailed. You can expand these videos out, and then you can play these videos very easily.
So that’s training videos. We also have a free two-hour training on our main website, MSAB.com. It’s a free training, anybody can take it, it’s a two-hour on-demand type deal, where you can familiarise yourself or others with how XAMN operates.
On the top of this Help file, you can also go into specific questions, based on, you know, maybe you’re looking at filtering, how to do filters; how to apply tags; how to do exports; how to import. There’s a lot of options here. Just take a look at our new HTML Help file, because I think it makes things easier. It makes your life a whole lot easier. A lot of good information here. It’s easier to navigate, it’s easier to search.
Aside from that, we also have the ‘What’s new’ little dialogue box: it’s going to tell you what’s been changed. This is the stuff that we’re covering today, mainly. Dynamic parsing of artifacts; password artifacts filter; custom date and time ranges; quick views; and it talks about our ability to export drone flight paths into Google Earth. And then there’s the next one which I’m going to hit on in this session, which is how to capture screen videos within XAMN.
Next to the Help file in the upper right, you’ve got the ‘Capture Video’ option. And this allows you to open up a video capture system… and I’m going to move this over to this screen….
This is really easy to operate. All you do is target what you need to show on the screen; you can expand the window out. It does not capture audio, just a live feed of what you’re recording. And then you can start the recording of any of the analysis that you’re doing. It’s going to store this video file in the XRY case folder for you. So when it comes time for court, and prosecution, it’s already there for you. You don’t have to find it again and put it in the right place; it’s going to be in the XRY case folder, it’s going to be there for you.
So hopefully that will make your life easier, as well: being able to capture videos of your analysis to make a compelling argument. Let’s close that out.
Up here in the middle of the top menu there’s a drop-down, next to the time normalisation, and that is the option to bring in that known data. Remember we talked about the known data earlier in the session? On the customer portal, you want to download the known data library, and then you can actually tell XAMN to exclude the known data. So it’ll put those stock images out of your way — that’s for Android. It will get rid of some of the excess.
We can also group duplicate artifacts. So if you bring in a UFED file and an XRY file, and you’ve got the same phone in both tools, and you want to see the differences, you can actually group the duplicates to make your life easier there.
Quick views is right next to the duplicate artifacts, and this is manageable. So we talked about this earlier: you can create your own quick view if you know that you want to reuse search criteria in your analysis. Maybe you see the WhatsApp platform used quite a bit in your investigations, or maybe another application, and you want a quick view for that application; well, I will show you how I would create that.
So, first I would actually go back to the Start tab, and I would launch a new window with all artifacts. And then what I’m going to do is I’m going to create a filter here. So we have our default filters on the left-hand side. But don’t forget that there’s a plus icon here, next to the filters, and there’s a bunch of different options that we want you to use.
So you can do a filter for applications; you can do a filter for deleted artifacts; for hash values, if you want to import your own hash values and reference that to your extractions. A word list: if you have a watch list that you want to apply, you can do that as well. So there’s a lot of filters in XAMN that you should familiarise yourself with, that you can operate.
For the example I talked about, with creating a quick view for, let’s say, WhatsApp, I want to create a filter for applications. And then you can see that this list populates in the filters pane, and I have all of the applications that were residing on those devices. We’ll not put an application in the list if it does not have data in it, because that’s a waste of time.
So what we’ll have here, is you can search down in the list of apps, and you can say “Alright, show me what’s on WhatsApp, I’m going to choose WhatsApp for the filter. And now that I have applied that filter, I have 64 artifacts from WhatsApp across all of these extractions.
If you want to remind yourself what’s included in this extraction, click on the little briefcase icon here, and it’ll tell you that I’m looking at all these exhibits combined. And you can remove those just by simply unchecking them.
So I have 64 artifacts, and now maybe I want to reuse this quick view in the future: I don’t want to have to create this WhatsApp quick view. All you need to do is go up to quick views at the top, and then now that I’ve applied that filter, I can save this as ‘WhatsApp.’ Well, I misspelled it, but I hit ‘Enter.’ So you’ve got a WhatsApp quick view, alright? And then that’s always going to appear in your list at the start screen. So if I go back to the start screen, now you can see that ‘Whats a’ — WhatsApp — quick view on the right-hand side.
If I go back to the quick views, maybe I’ve created a quick view that I think someone else would find advantageous: all you need to do is unselect all of these — I’m going to select the little person icon there for WhatsApp quick view — and I’m going to select on the three dots here, and I’m going to say ‘Export that quick view.’ You can export quick views to share them with other people that you work with.
The last quick view that I’m going to show you real quick is our… well, a couple I’ll show real quick. We have the geo tagged artifacts as a quick view: so this is going to populate a map that shows you where we have geolocation points. So it toggles me over to the geographic view. And then it shows me a nice map; it shows me where I have plots of interest. And you can actually hover over the little artifacts, and you can see what we’re looking at.
You can zoom all the way in to the street level, and then you can actually select the artifact of interest. Once you do that it’s going to tell you the file path; it’s going to show you everything in the metadata; and then I can choose… in this case it’s a video that has geolocation data, and I can play the video directly from XAMN. So that’s that quick view.
The other quick view that I’ll bring up is the connection view. This applies several filters. And it’s going to show me everything in our link analysis, our connection view. This is really cool. This can get really busy if you do too many selectors, but if you drill down to what’s important to you, you can actually see the little web: the overlapping of the activity on the devices; who’s talking to who — you know, you can see how people are connected. If you’re on a drug case, you can see who’s the leader based on the activity in the web view, and you can really drill down. This is included in your XRY licensing, this is not an add-on, this is already included.
The other quick view that’s of importance is going to be the chat view. The chat view gives you the ability to break down communications across the devices based on the application, the chat apps. So you can actually select the column headers, and you can reorganise… so you can search by account. Let’s say you want to look at this Kik thread. So I choose that message thread, and then I have the details of the conversation here in this column. And then if I choose an individual artifact, I can view the metadata on the far right pane.
We have the ability to do language translation in XAMN. So you can either translate one artifact — if I choose this message — in the metadata it’s going be a right click — always a right click in the metadata — I can actually select it and say ‘Translate only this artifact.’ Or maybe I want to turn on sticky mode — we have a little pin drop here — and I want to highlight four or five artifacts over a whole message thread, and maybe it’s in Spanish and I want to translate it to English.
Well then I just go ahead, highlight a bunch of those, I right click on the text in the metadata, ‘Translate,’ and this time I would choose ‘All selected’ and it would translate all of those artifacts. The translation license is an extra, but reach out to me, I’m happy to set you up with one to try it out for a while, complementary, to see if it’s effective and it makes your life easier. So we’re always building those types of capabilities into the tool.
I believe that covers most of the big developments in XRY and XAMN. Hopefully you’ve found this really informative. I’ll talk to you guys soon. Thank you so much.